“Hearst Magazines and Yahoo may earn commission or revenue on some items through these links.”
With an almost infinite list of DIYs available online, it can be intimidating to find the best crafts for kids that don’t involve complicated materials or advanced skills. To make that process a whole lot easier, we rounded up our favorite kid-friendly projects, including a mix of fun crafts especially for summer.
Not only can arts and crafts keep kids entertained for hours on end, these DIY activities can also help boost a child’s creativity, develop their hand-eye coordination and leave them with an end-product they’re proud to show off. While kids can tackle most of these crafts on their own (with parent supervision, of course), a few might require a little assistance on your end depending on the age of your children.
Gather your popsicle sticks, buttons and beads and encourage your kids to put their creativity to the test. We’ve included a number of holiday-themed crafts and additional seasonal picks (think spring crafts and beyond). And if you’re looking for an everyday DIY, we’ve got your covered with projects like origami hearts, clay necklaces and more.
Pipe Cleaner Garland
Pipe cleaners can be used to make simple yet stunning garland. Simply loop pieces of pipe cleaner together (metallics work) and twist the ends to secure each piece.

Floral Wreath
Here’s a simple way to upgrade the front door. Start with a preserved boxwood wreath base and dried flowers. Help your kids attach the larger flowers to the wreath with a generous amount of hot glue. Tuck some of the smaller ones throughout the wreath for a sweet touch.

Cupcake Liner Poinsettias
Kids love cupcakes, so why not have some fun with cupcake liners? All you have to do is flatten red cupcake liners, fold them into quarters and cut out a single petal shape. When you unfold the liner, you should have a flower with four petals. Layer the petals so that they overlap and secure them with double-sided tape or glue dots.

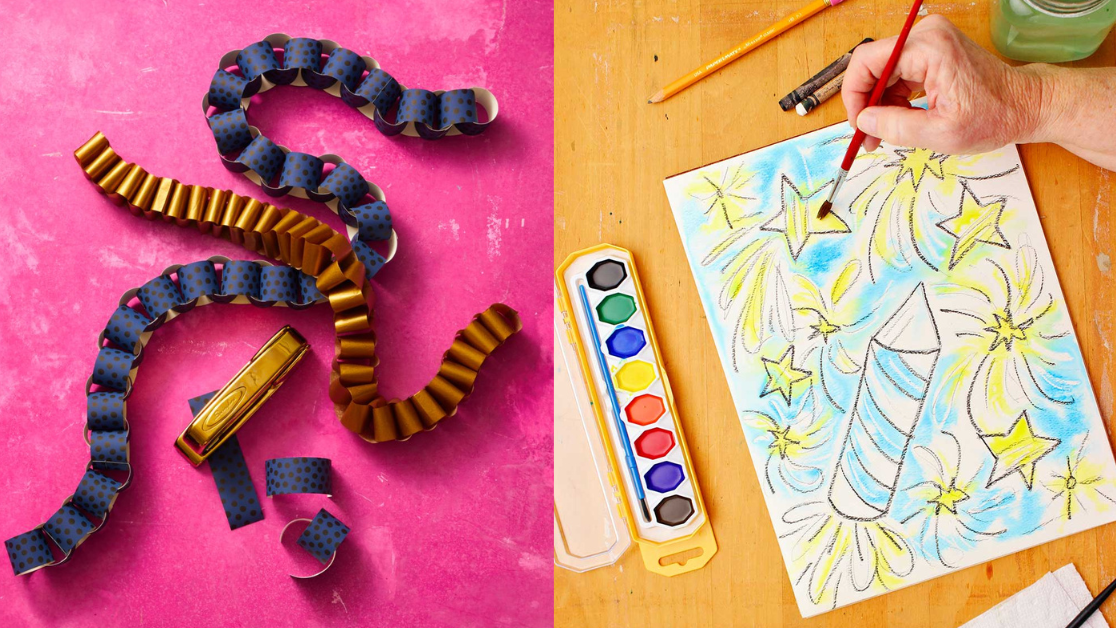
Paper Chain Garland
Say goodbye to boring garland. With just wrapping paper, scissors and a stapler, kids can create their own stylish paper chain garland to hang around the house. Cut 3 x 6 inch strips of wrapping paper, craft paper or tissue paper so that you have enough to complete your desired garland length. Loop the paper and staple the ends together to create a circle. Thread the next strip into the loop you just created and staple the ends together to start the chain. Once completed, hang on the mantel, fireplace or anywhere you want some extra homemade decor.

Watercolor Resist
Using crayons, draw your favorite design, cartoon character or holiday-themed image. Once you’re ready, paint over your sketch. The wax from the crayon will resist the watercolors, making the image pop.
Get the tutorial at Welcome to Nana’s »

Origami Paper Fortune Cookies
With just a few folds, the whole family can make their own origami paper fortune cookies. This blogger suggests using scrapbook paper for a sturdier design.
Get the tutorial at Unsophisticook »

Cake Toppers
While you prepare the cake, the kids can tackle the decorations. These paper cake toppers can be used for a variety of holidays and even birthdays — just switch up the colors depending on the occasion!
Get the tutorial at The House That Lars Built »

Sidewalk Chalk Paint
Forget traditional sidewalk chalk this summer and go for chalk paint instead. Little ones will love using a paint brush on the sidewalk to express their creativity all season long. Just make sure you have a high-pressure spray hose ready to rinse it down once everyone’s finished.
Get the tutorial at The Best Ideas for Kids »

Book Bins
Put leftover boxes to good use with this DIY book bin craft. All you have to do is cover the box with construction paper and clear packing tape. You can also add a book series logo or write your own design on the front for added personalization. Not only is this craft a creative way to help kids stay organized — it may even encourage more reading!
Get the tutorial at Crafting Cheerfully »

Pipe Cleaner Spider
With very minimal supplies, kids can create their own spider friends. Simply punch holes in a paper plate, wrap pipe cleaners through and design the face with a smile and googly eyes.
Get the tutorial at A Sparkle of Genius »

Origami Hearts
Whether you’re celebrating Valentine’s Day or your kids just want to practice their cutting and folding skills, these simple paper hearts are an easy way to get them interested in origami crafts. With just thick paper, scissors and their two hands, kids will be able to transform the colored paper of their choice into a cute decorative heart.
Get the tutorial at Alice & Lois »

Bedroom Door Sign
Grab a small chalkboard, watercolor paint and some ribbon, and let kids have fun decorating a sign to hang outside their bedroom door. The best part? They can change their message as often as they want so that the craft lives on even after the main work is completed.
Get the tutorial at Crafting Cheerfully »

Rock Painting
Rock painting is a simple, enjoyable project that combines outdoor activity with crafting. Plus, kids can have complete creative control over what they paint on their rocks. Whether it’s a cartoon face or a design of some sort, their rock painting can be put to display in the garden or indoors.
Get the tutorial at Crafty Little Gnome »

Minion Pencils
If your kids love the “Despicable Me” franchise, these minion pencils are the perfect craft for them. With pencils, googly eyes and foam paper, create your own mischievous minion. Draw on facial expressions with a black Sharpie and voila – writing just got more fun.
Get the tutorial at Kid Friendly Things to Do »

Branch Spider Web Wreath
Preparing for Halloween? Try this wreath made from spider webbing and twigs! Have your kids gather some sticks, cutting or breaking them so that they are between five and 10 inches long. Assist them in cutting a wreath shape out of cardboard. It should be around 12 inches in diameter with a five-inch circle cut out from the inside. Hot glue the twigs to the wreath, layering them so that they fill up all of the space on the cardboard. After drying, stretch spider webbing around and tuck in a few fake spiders with hot glue.

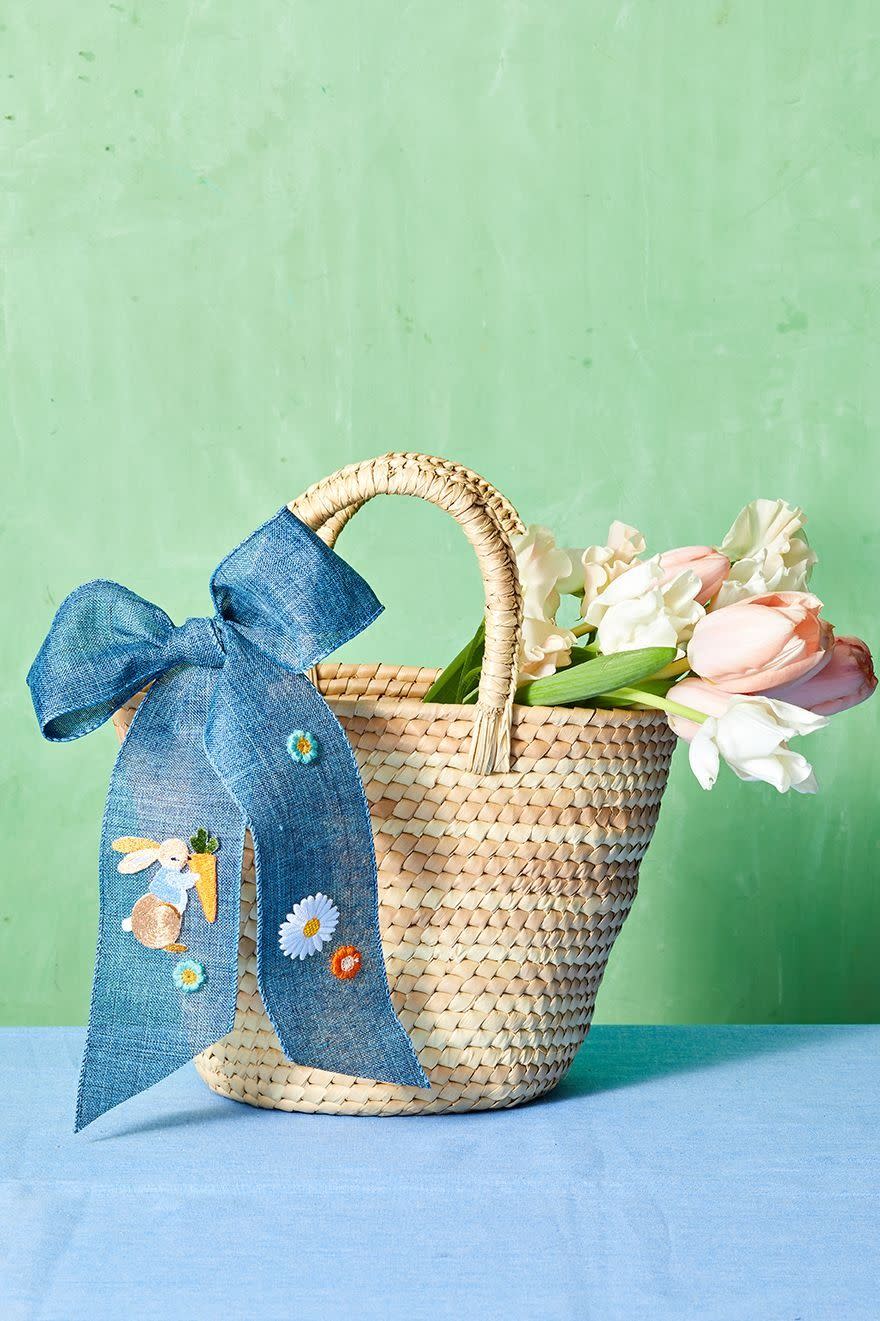
Embellished Bow
Here’s a quick way to take a basic straw basket to the next level! Kids can embellish bows with iron-on patches and stenciled monograms. Help them create their own bows using a 3″ wired ribbon or purchase a large one to design. Then, use fabric glue to attach the decorative patches.
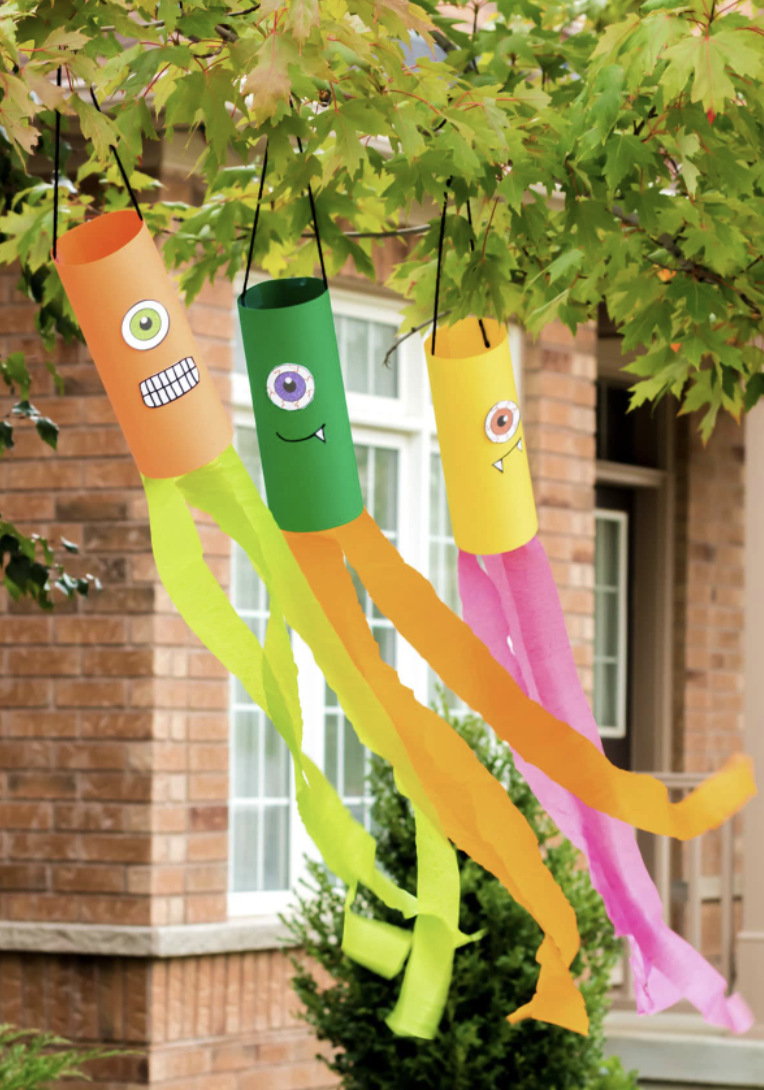
Monster Windsocks
This is a great group project for the kids. Let the kids cut, fold and draw on cardstock to create wide-eyed monster windsocks for the backyard.
Get the tutorial at Crafts by Amanda »
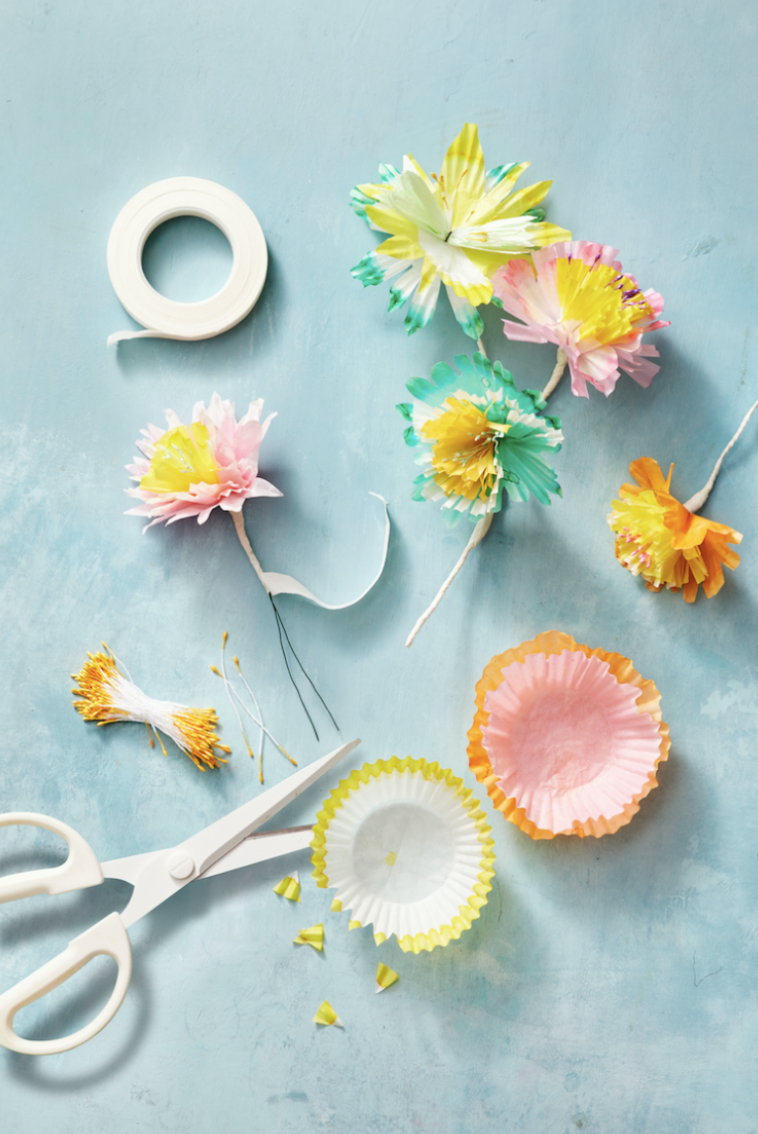
Paper Flowers
They’ll enjoy making these colorful paper flowers to decorate their bedrooms. They’ll first fold dyed cupcake liners in half and cut out petal and fringe shapes. Have them fold a piece of floral wire in half and twist it around the faux flower stamen. Poke the wire through the center of three to four paper liners. Finish it off by wrapping floral tape around the base of the liners and bringing it all the way down the stem.
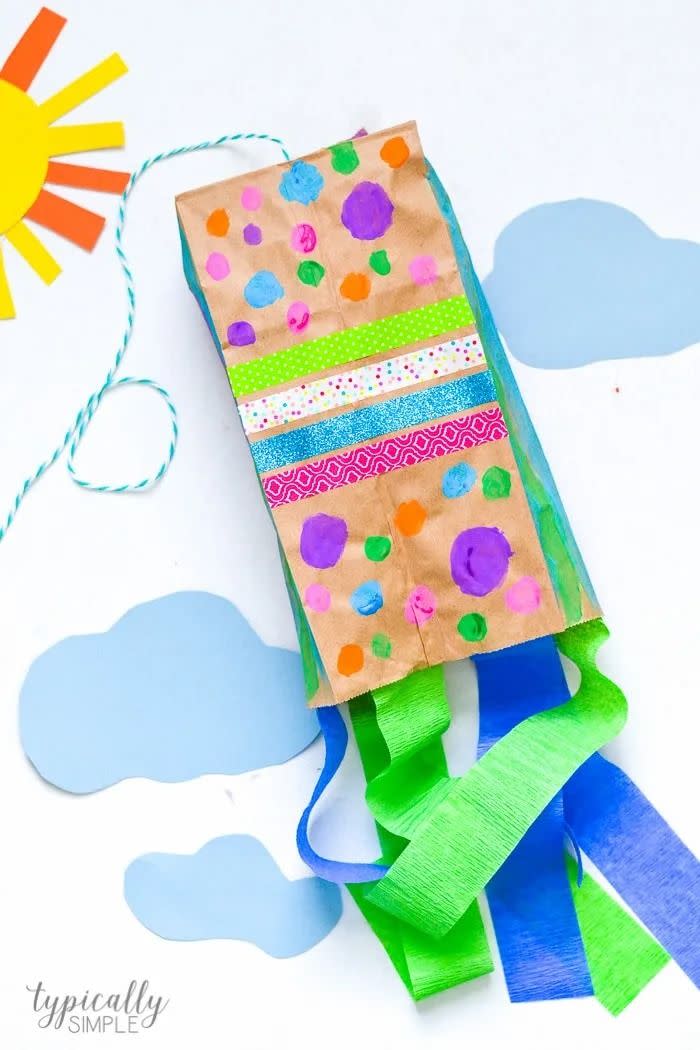
Paper Bag Kite
What’s not to love about flying a kite? Luckily, kids can make their own with paper lunch bags. Let them embellish the bags with stickers, washi tape, paint and any other colorful accessories. Then, work on attaching the yarn and streamers so the kite will be ready to fly.
Get the tutorial at Typically Simple »
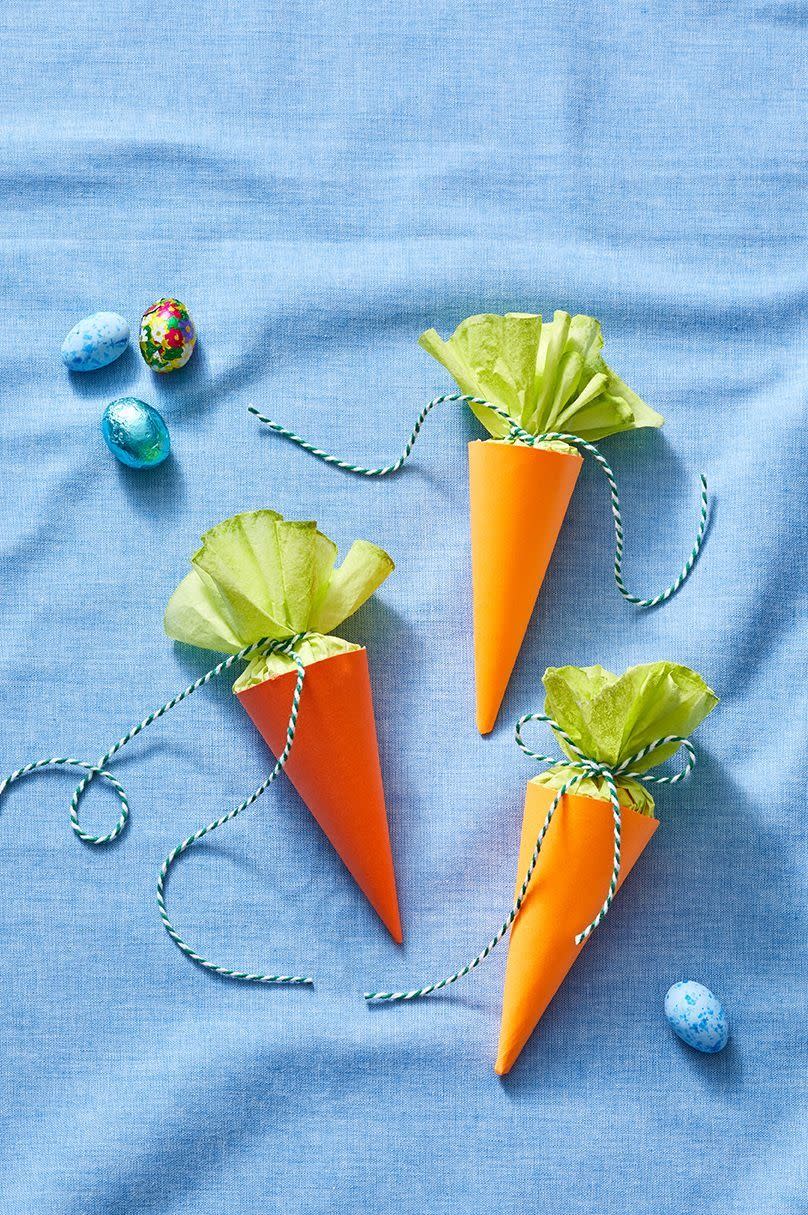
Carrot Treat Cones
Easter may have passed, but that doesn’t mean this carrot treat cone craft should too! Mix a few drops of green craft paint with water until it reaches the consistency of milk. Soak coffee filters in the paint mixture until fully saturated (you can do this simultaneously). Squeeze out excess paint and lay the filters flat to dry on paper towels or hang them from a hanger with a clip or clothespin. Download our template and trace it onto orange paper. Cut out and roll the template into a cone shape, adhering the sides with double stick tape. Cut out the center of the painted coffee filters. Attach the remaining paper to the inside edge of the cone with double-stick tape. Fill the “carrot” cone with small treats and tie twine around the top to close.
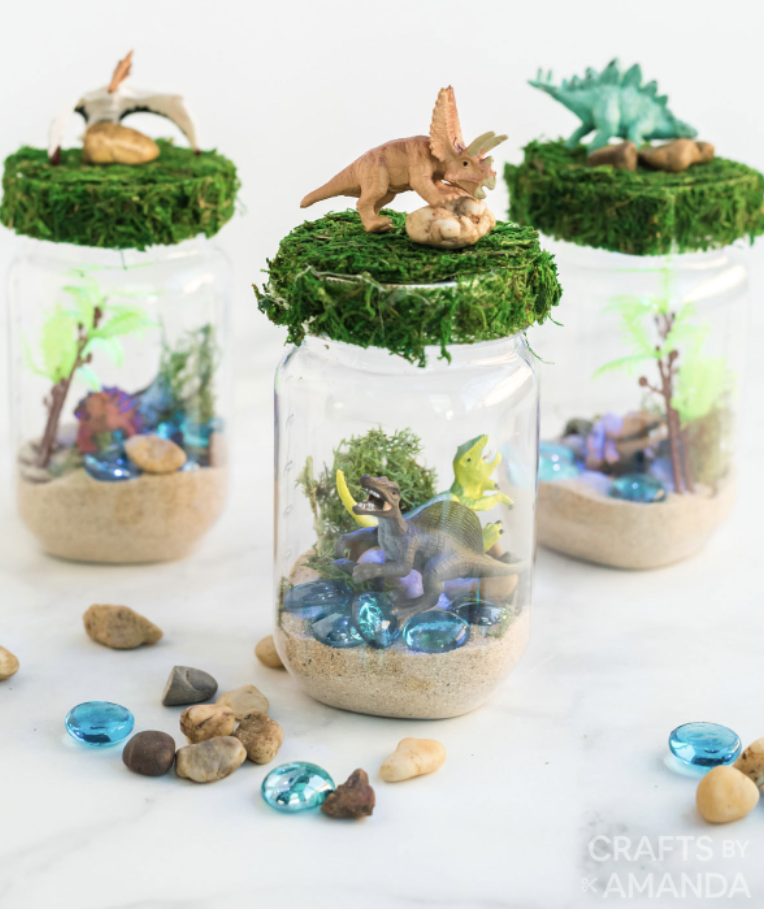
Dinosaur Nightlife Terrarium
Transform mason jars into terrariums fit for mini plastic dinosaurs. It also makes a creative nightlight for kids who are still scared of the dark.
Get the tutorial at Crafts by Amanda »
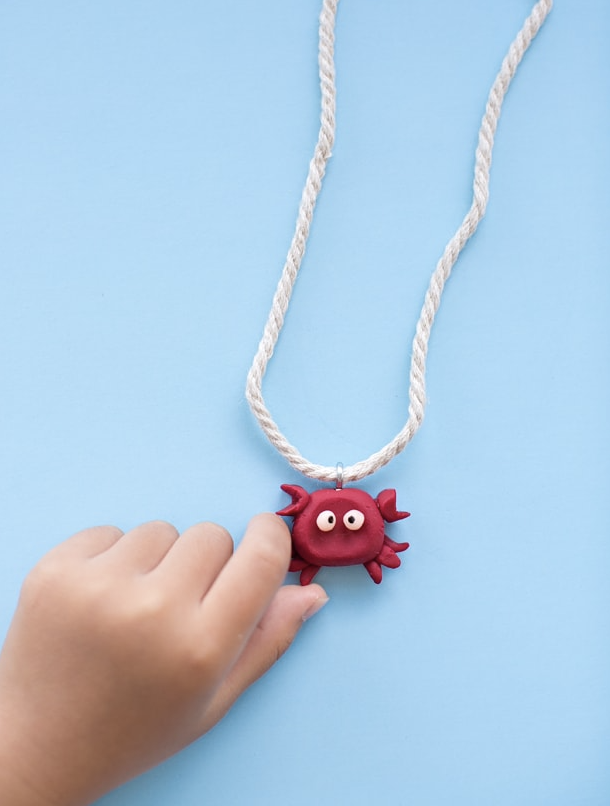
Clay Crab Necklace
If your kids are obsessed with sea creatures, they’ll love making and wearing their very own crab necklaces. Plus, the craft only requires clay, twine and an eye hook.
Get the tutorial at Hello Wonderful »
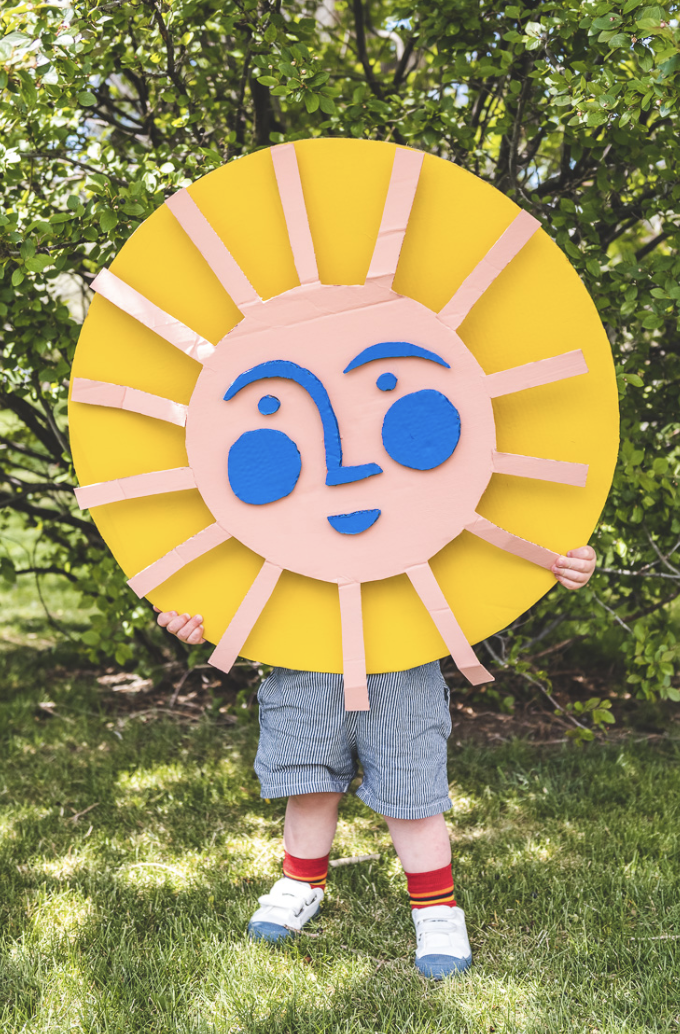
Cardboard Suns
Here’s an eco-friendly craft that requires lots of cardboard and creativity. Help your little ones cut, paint and design large and mini cardboard suns to scatter around the backyard.
Get the tutorial at The House That Lars Built »
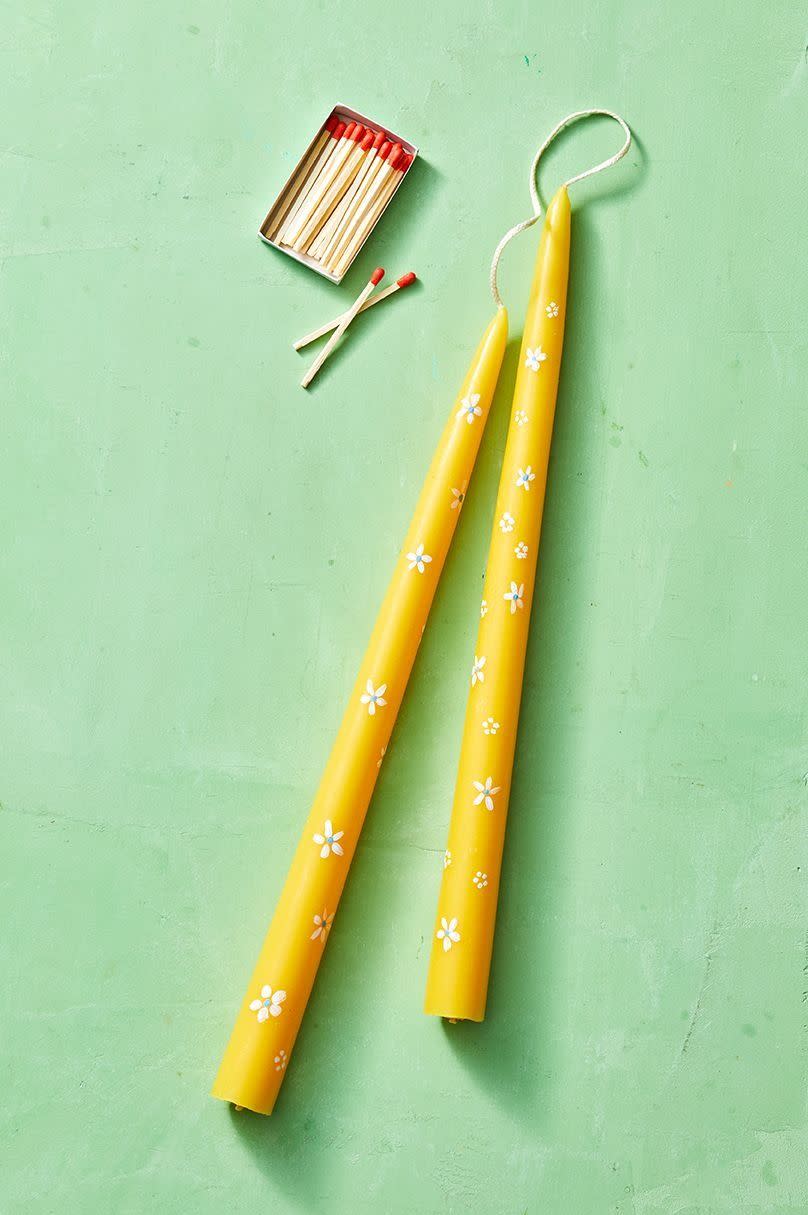
Paint Marker Candles
Grab some paint markers (or acrylic paint) and watch them draw flowers, swirls and all sorts of cool shapes and designs on taper candles. Use a clean cloth with rubbing alcohol to remove any lint and debris before starting.
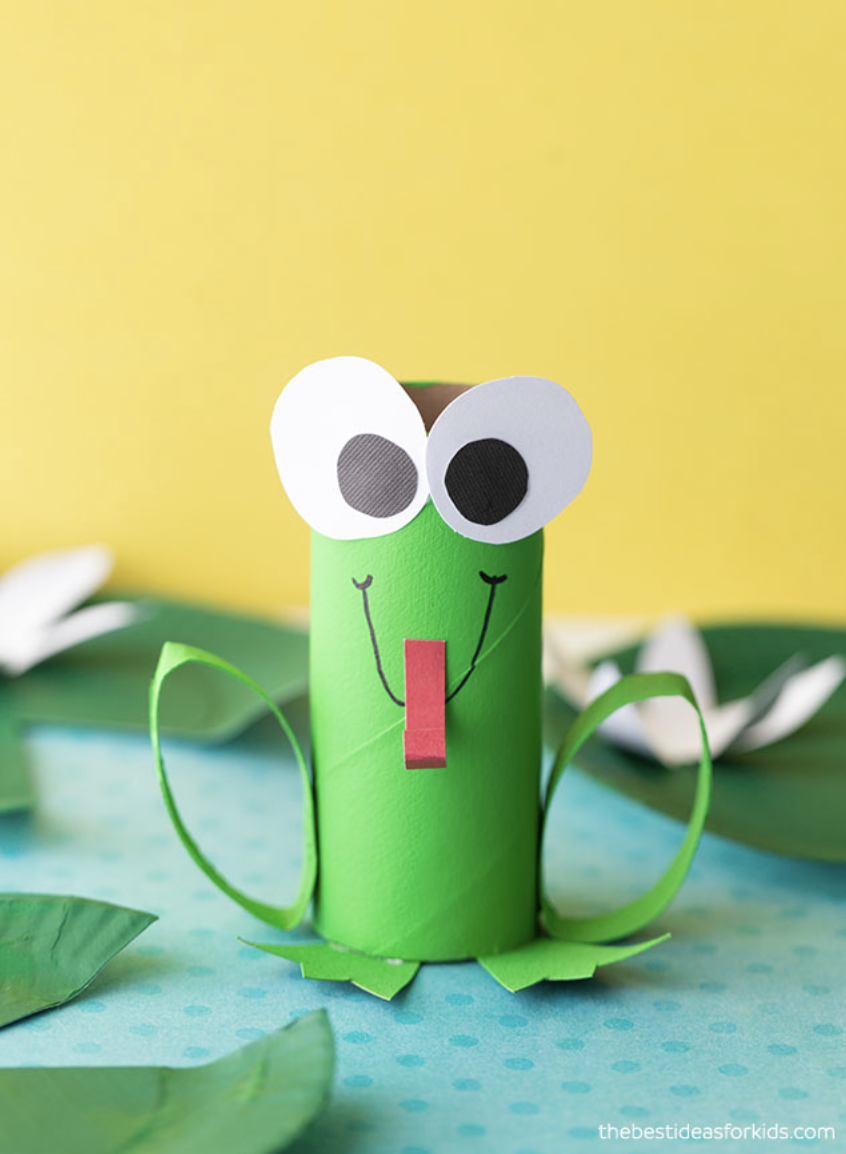
Toilet Paper Frog
You’re sure to have these supplies in your kid’s craft box. Grab those discarded toilet paper rolls for kids to paint and turn into frogs. Then, have them transform paper plates into lily pads.
Get the tutorial at The Best Ideas for Kids »
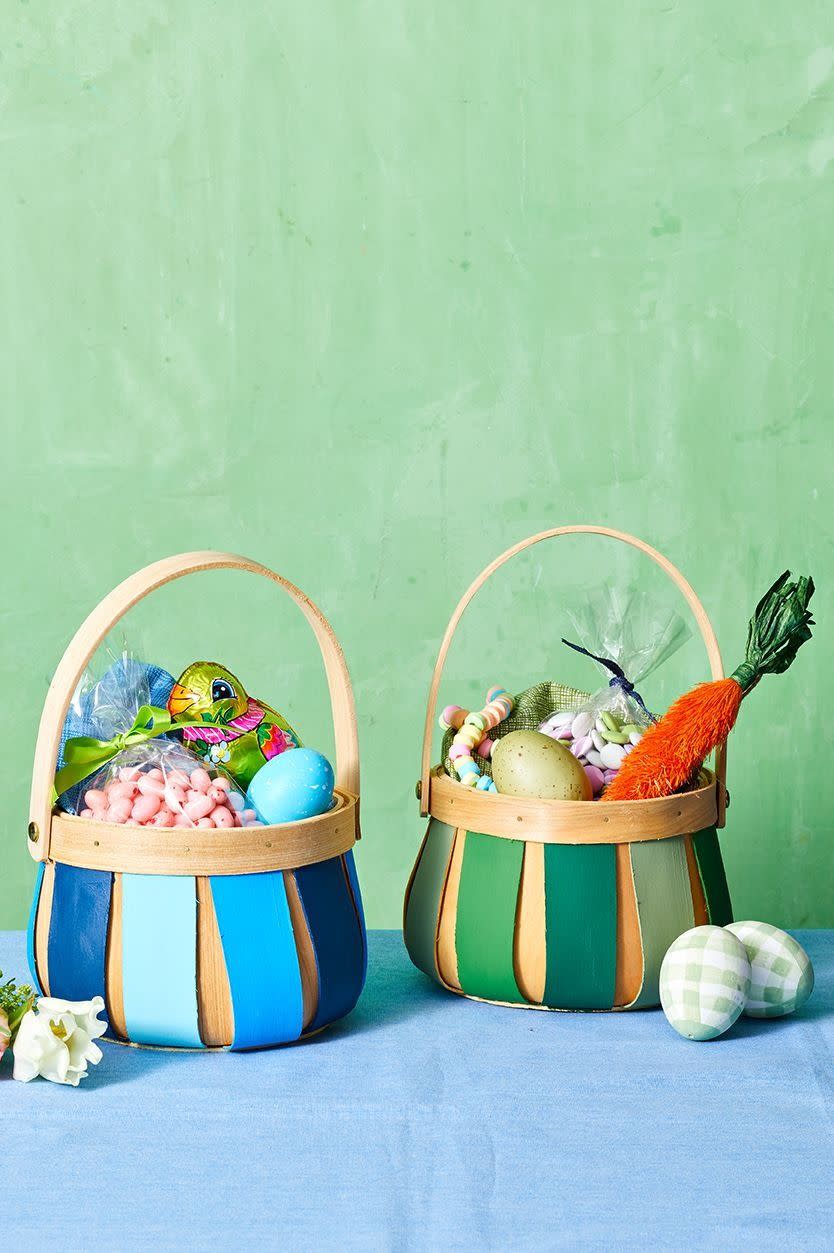
Painted Baskets
It doesn’t get more simple than this: Kids can spend time outdoors painting the wood strips of plain wooden baskets to carry their toys in and out of the house.
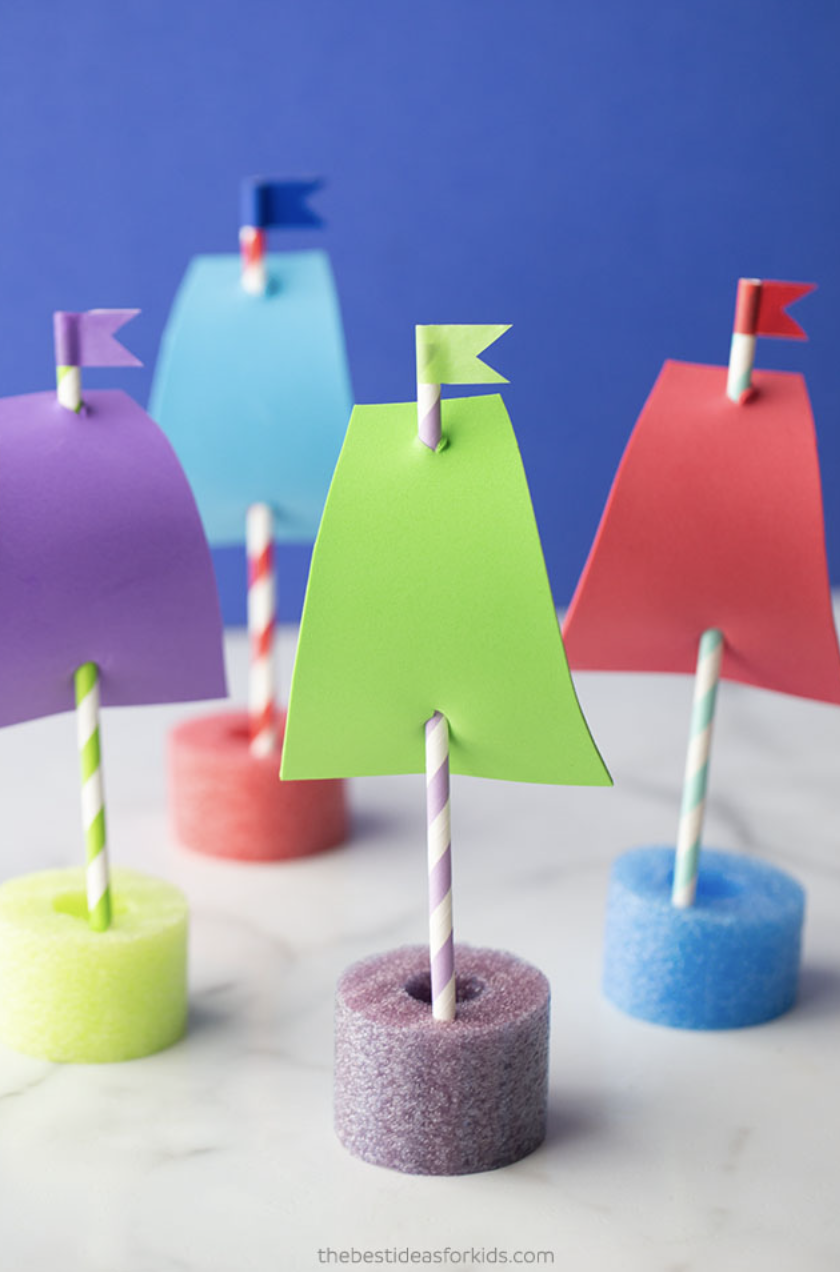
Pool Noodle Boats
After making these eye-catching boats, let kids set them afloat in the tub or swimming pool. It’s a fun craft to recycle any old pool noodles and paper straws.
Get the tutorial at The Best Ideas for Kids »
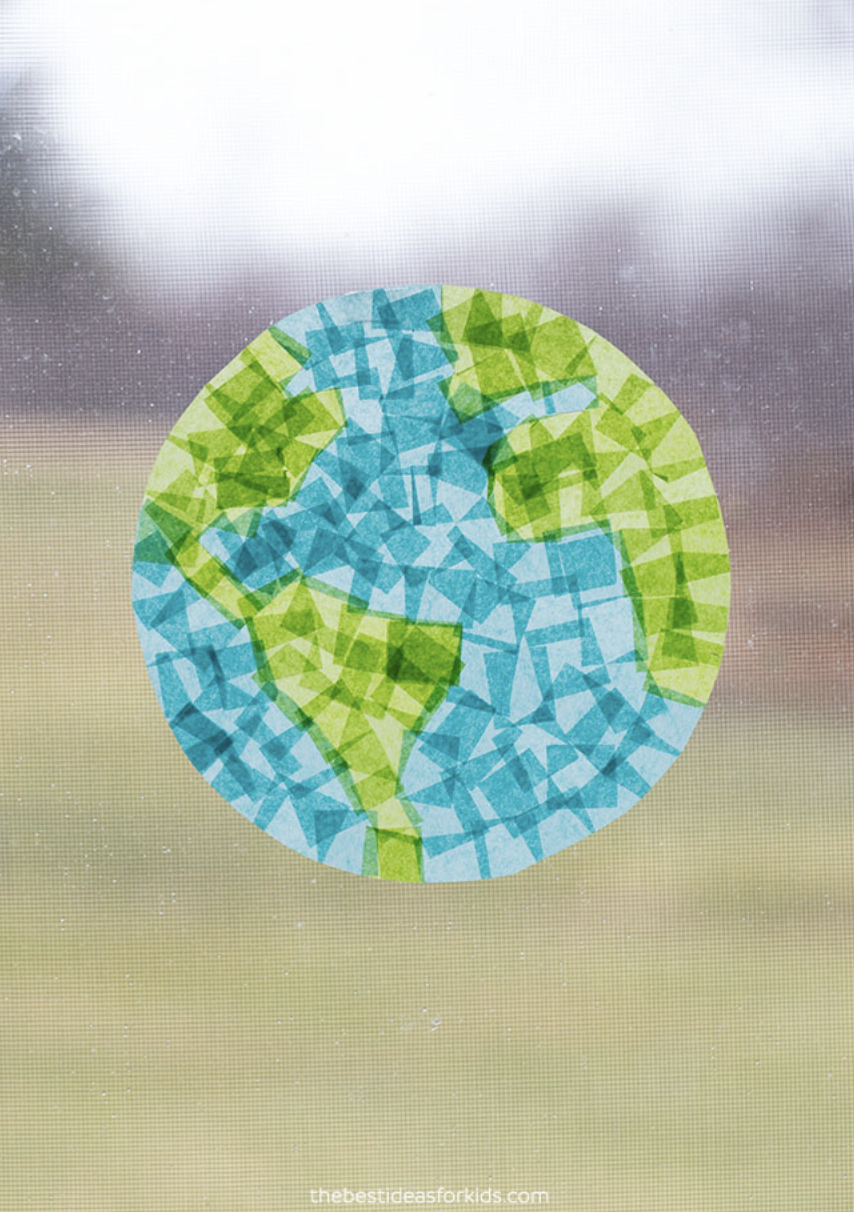
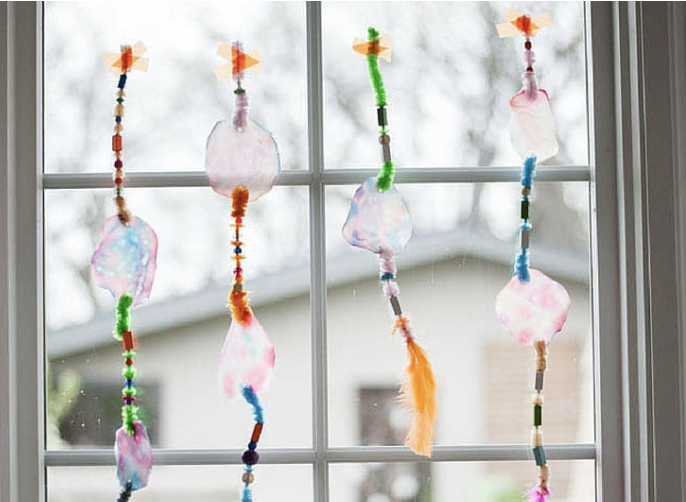
Tissue Paper Suncatcher
Purchase or gather discarded tissue paper to make suncatchers. They’ll also need laminating sheets, tape and an Earth-shaped template.
Get the tutorial and template at The Best Ideas for Kids »
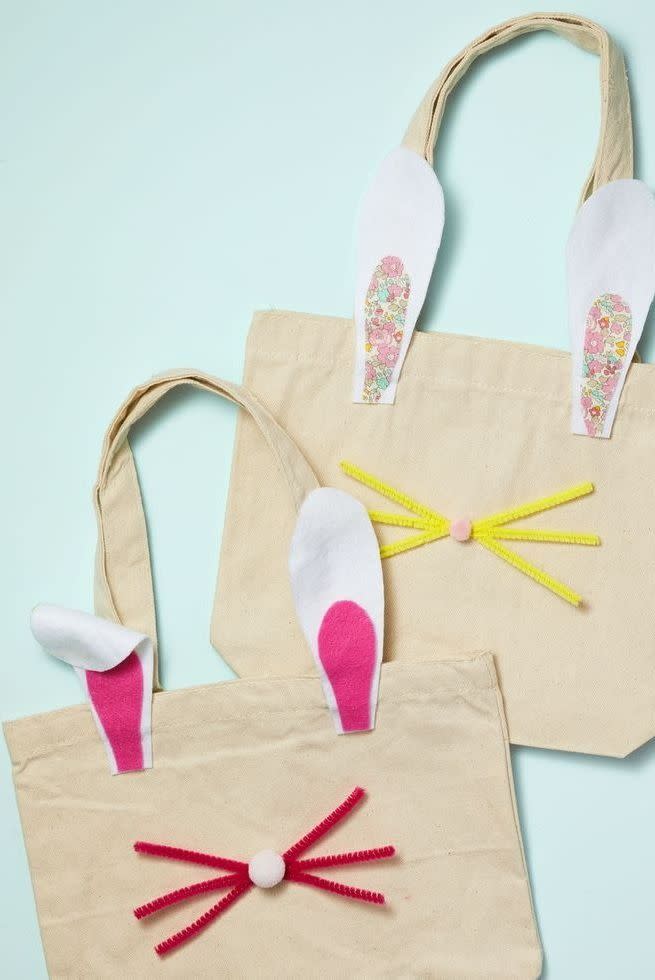
Bunny Bags
Use our bunny-ear template to DIY these adorable bunny bags. They’ll have to trace the outer ear onto white felt and the inner ear onto colorful or patterned fabric. Show them how to attach the ears to the top of a canvas bag with hot glue. Then, hot glue on a pom pom nose and pipe cleaner whiskers to complete the bunny bag’s look.
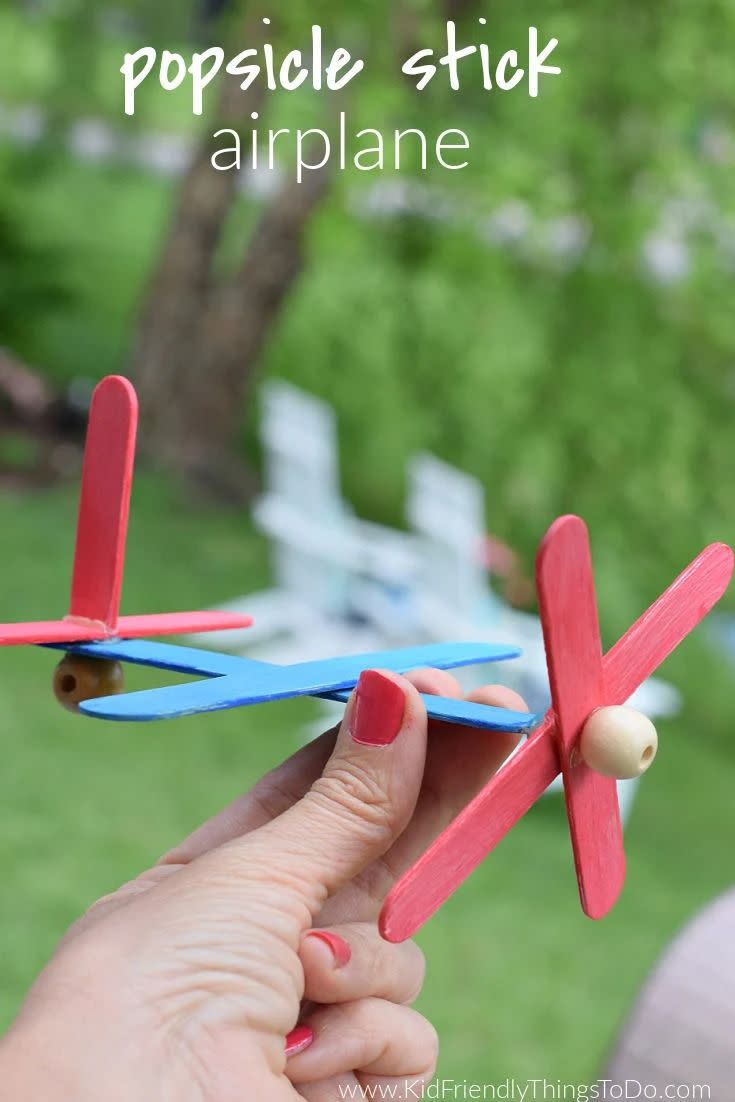
Craft Stick Airplane
They’ll love zooming around the house or backyard with their craft stick airplanes. Paint the craft sticks (or use pre-colored ones) before gluing them together to make these aircrafts.
Get the tutorial at Kid Friendly Things to Do »
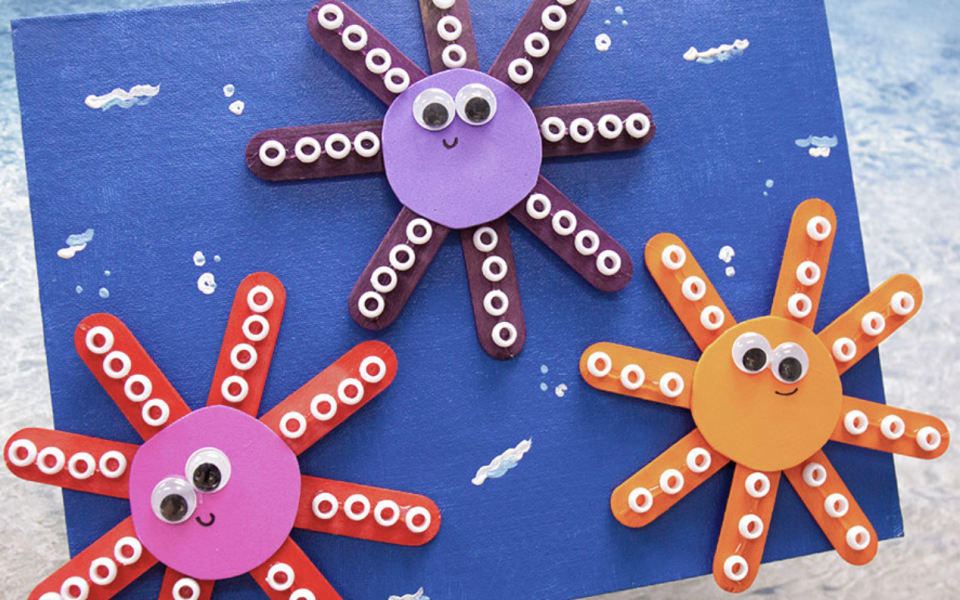
Craft Stick Octopus
Only a few materials, including craft sticks for the tentacles and foam for the faces, are needed to make these cute octopi.
Get the tutorial at Craft Project Ideas »
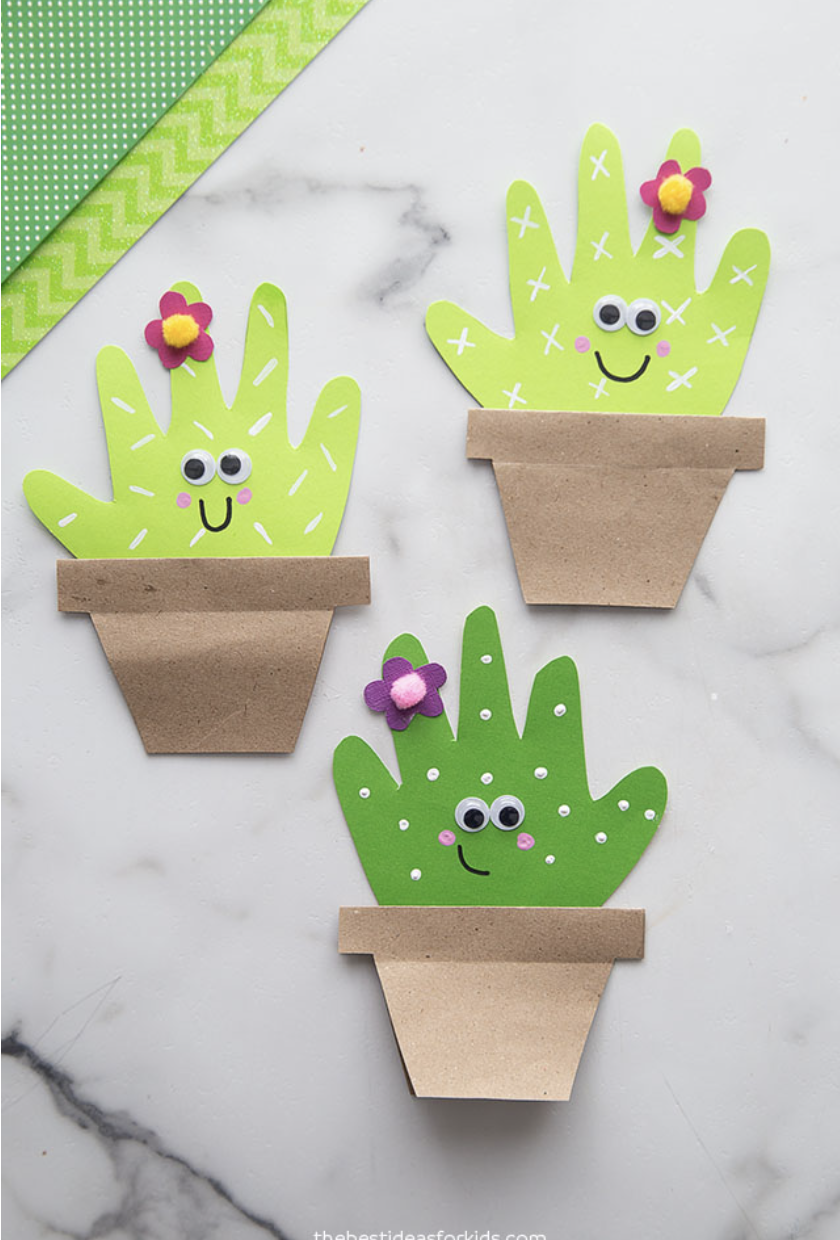
Cactus Handprints
Trace their hands on green cardstock to make the cacti. Use brown cardstock for the pots, add googly eyes and draw on a cute smile.
Get the tutorial at The Best Ideas for Kids »
Toilet Paper Crayons
These toilet paper crayons make adorable pencil and pen holders. We bet displaying them in their study room might motivate them to focus on work.
Get the tutorial at The Best Ideas for Kids »

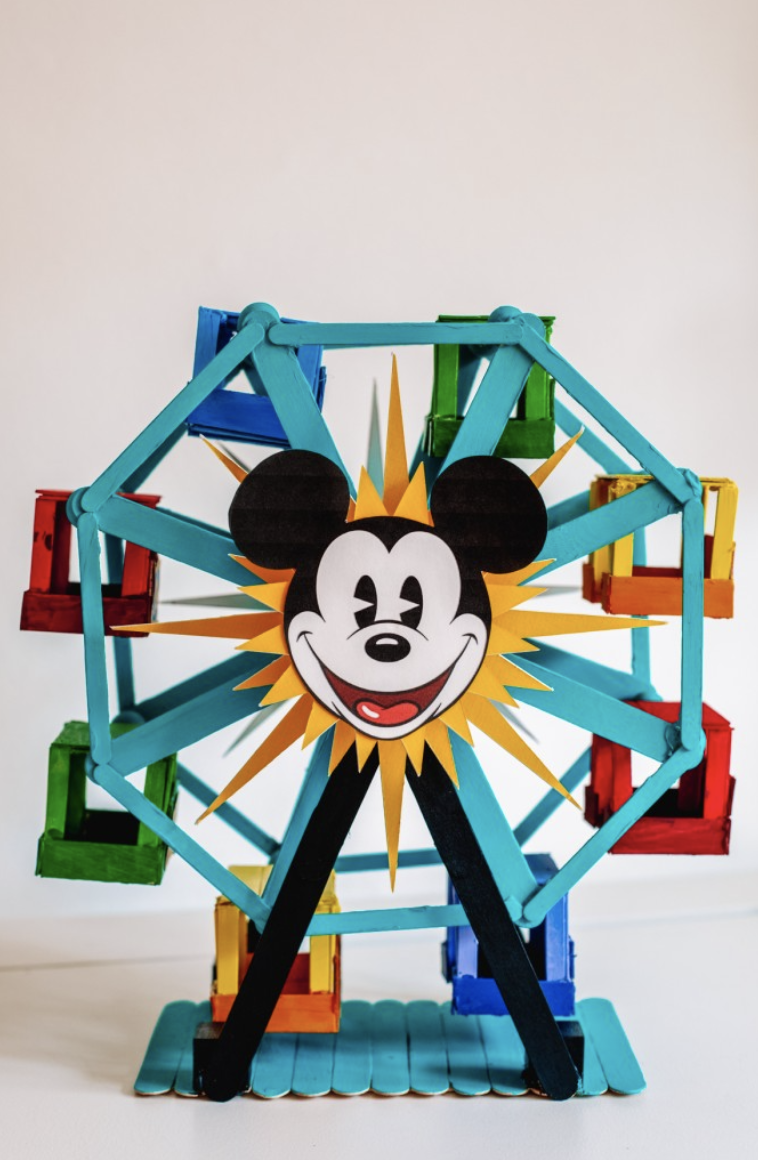
Craft Stick Ferris Wheel
Bring a popular amusement park attraction to their room (or a mini version of it) using craft sticks and wooden blocks. It’s a project worth cherishing and displaying for friends to see.
Get the tutorial at Studio DIY »
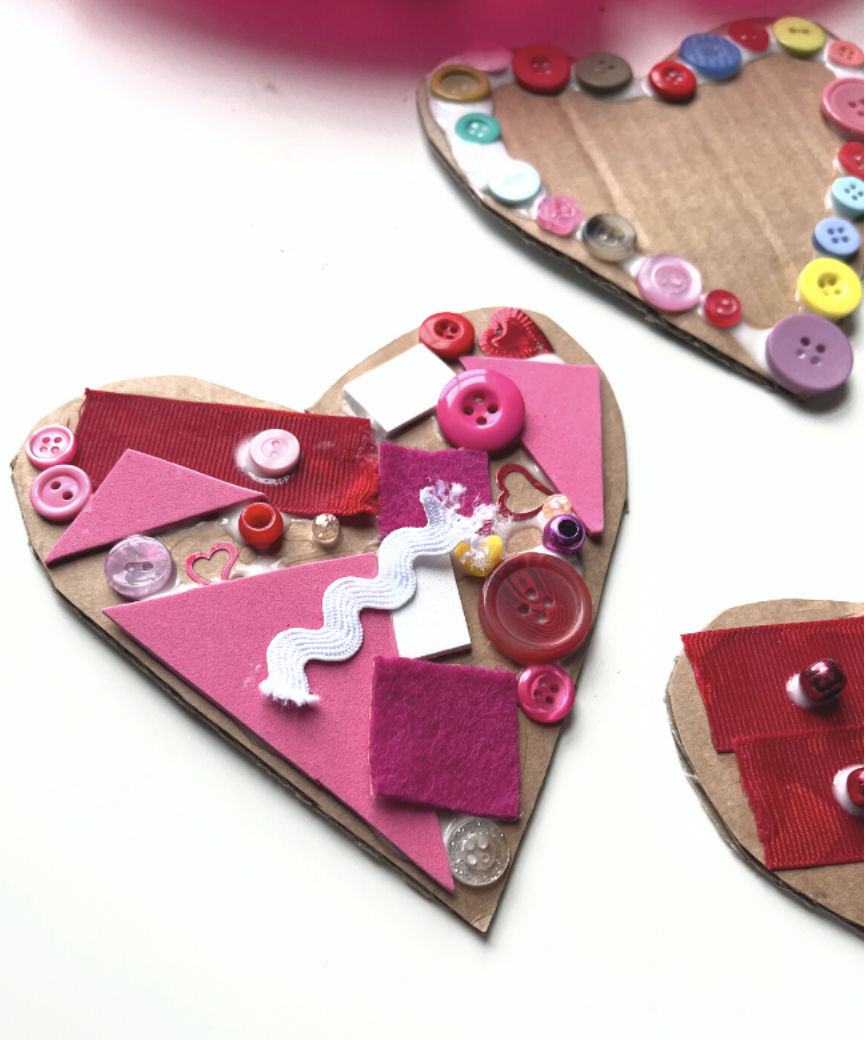
Heart Collage
Other than needing cardboard, scissors and glue, kids can make their own heart collages with any materials you already have in your art bin (from glitter hearts and felt to buttons, beads and ribbons).
Get the tutorial at No Time for Flashcards »
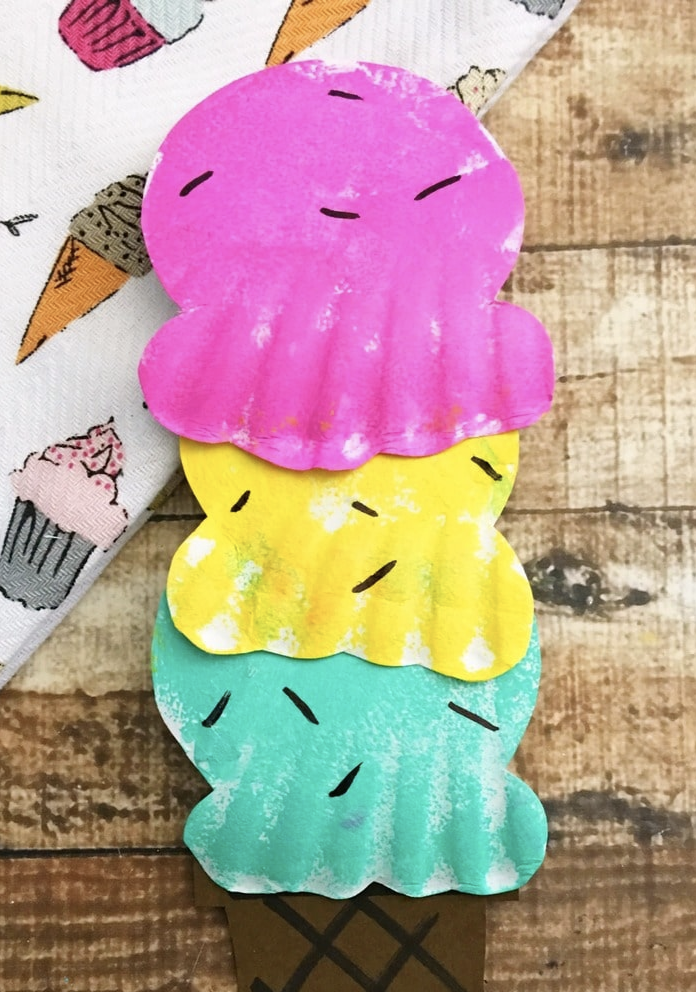
Paper Plate Ice Cream
Is ice cream their favorite dessert? If so, DIYing their own with paper plates might just satisfy their sugar cravings. Plus, they can make as many scoops as they like.
Get the tutorial at The Simple Parent »
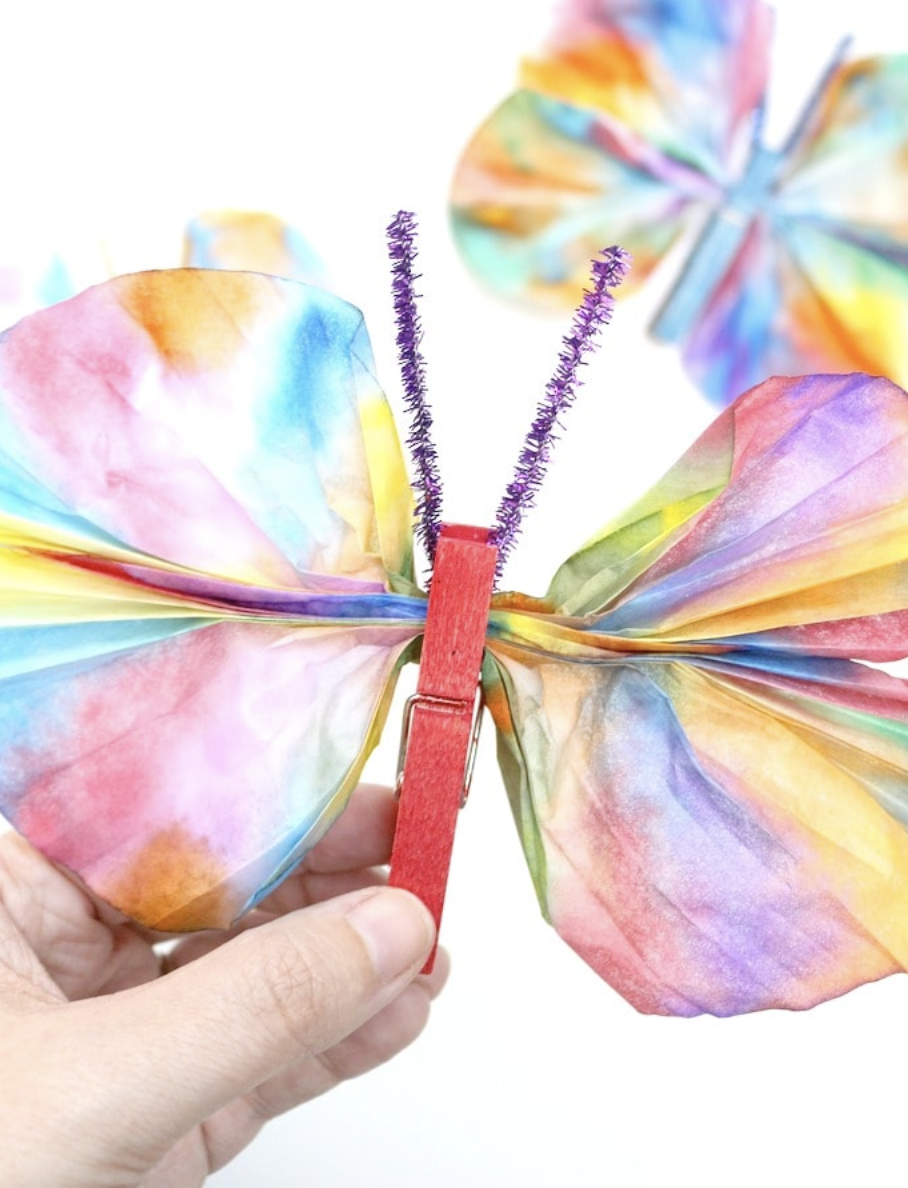
Coffee Filter Butterfly
Coffee filters are great for crafts because you’re sure to have some around the house. Plus, they can be used for an array of DIYs —including turning them into wings for a clothespin butterfly.
Get the tutorial at The Simple Parent »
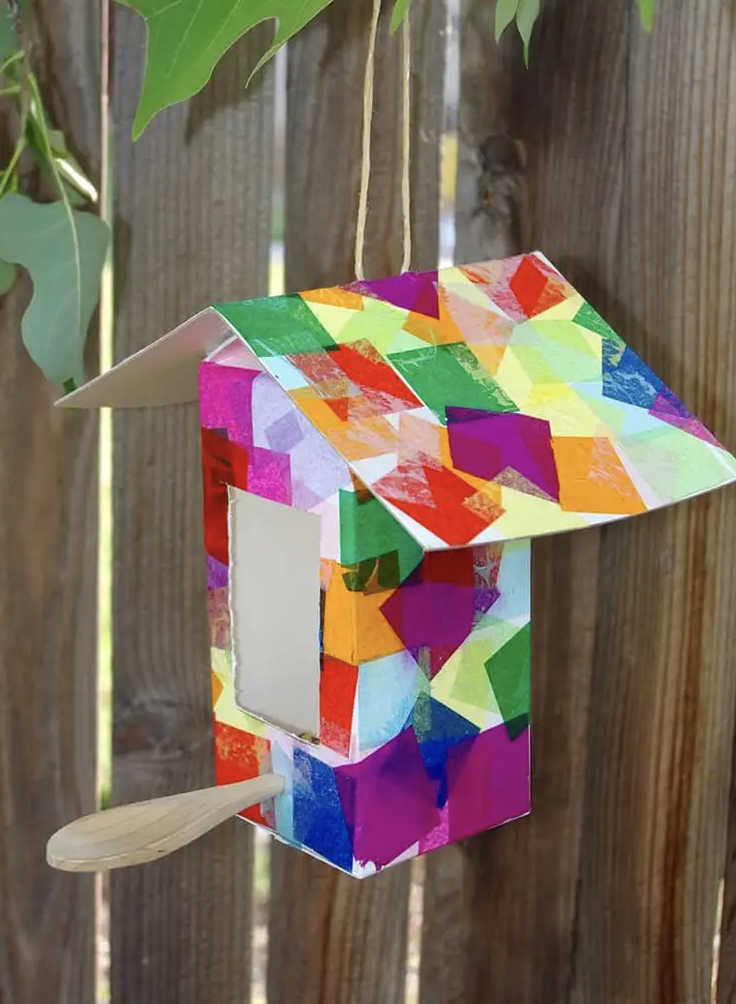
Milk Carton Birdhouse
Before throwing away a milk carton, use tissue paper to turn it into a birdhouse and feeder. Let kids coat the carton with glue before applying tissue paper squares in their desired arrangement.
Get the tutorial at Happiness is Homemade »
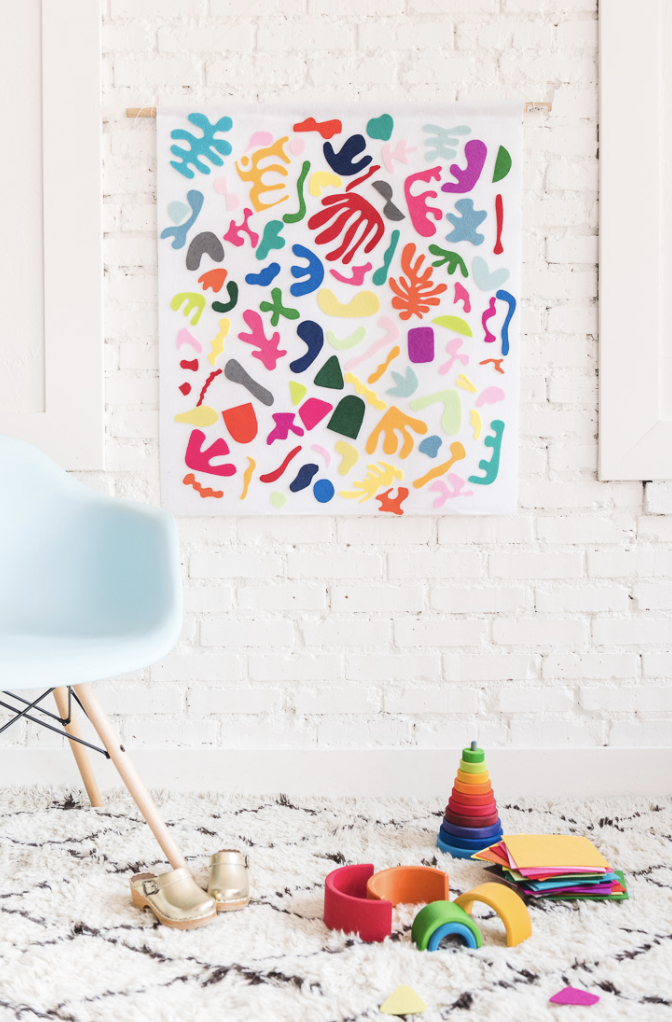
Matisse Felt Board
Use colorful felt pieces to make a Matisse-inspired masterpiece for their room. Blogger Brittany shares a few colorful cut-out templates if you’re lacking inspiration.
Get the tutorial at The House That Lars Built »
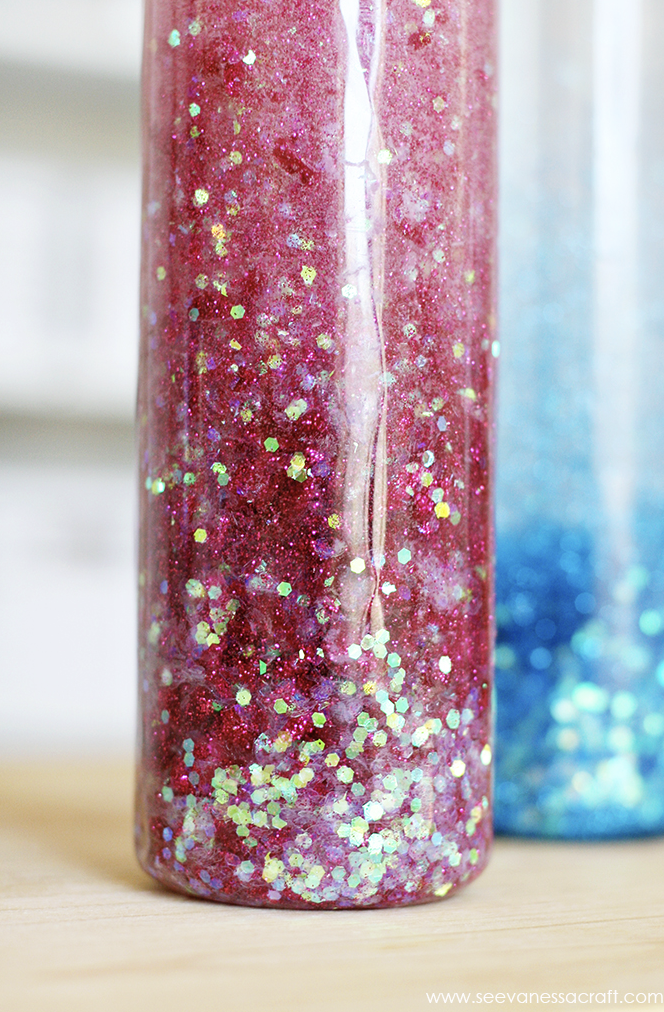
Glitter Sensory Bottles
Most kids love glitter. After making these sensory bottles, filled with hot water and glitter, they’ll be mesmerized by the sparkling display that happens when the bottle is moved.
Get the tutorial at See Vanessa Craft »
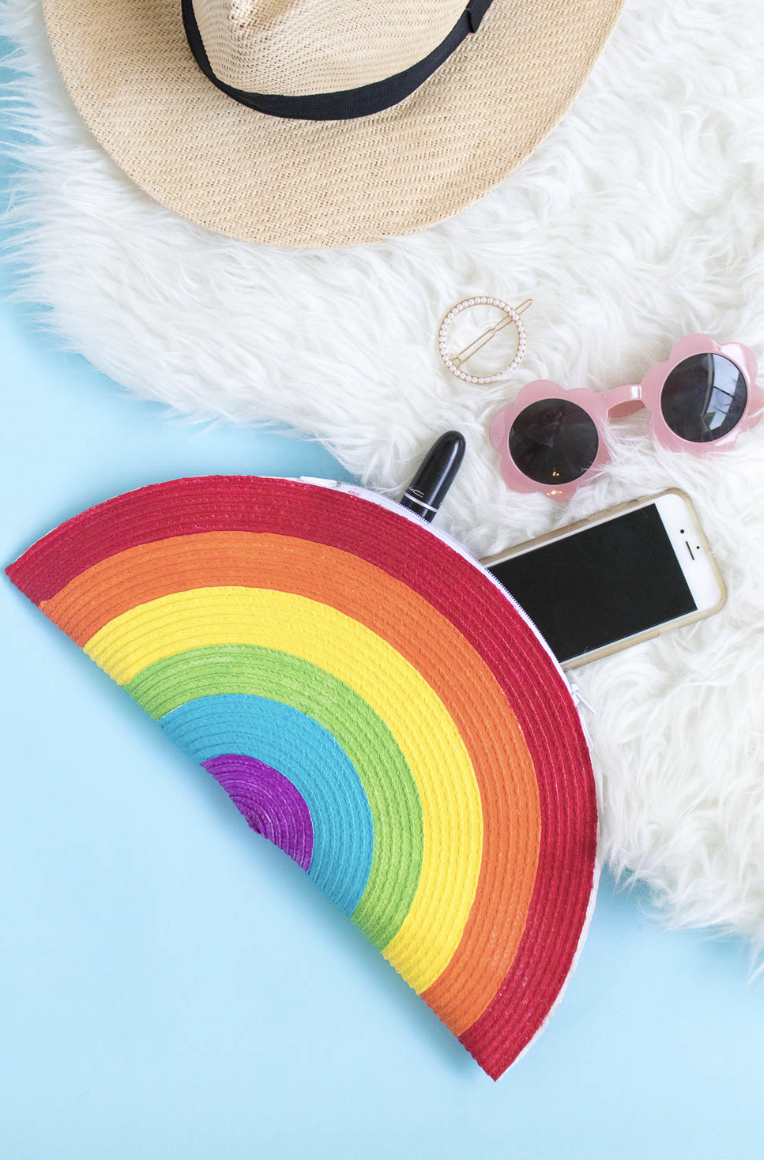
Rainbow Clutch
This clutch is perfect to make and use for spring and summer. It’ll hold all their go-to essentials (pens and pencils included). It’s also a great craft to teach kids how to sew or use a sewing machine.
Get the tutorial at Club Crafted »
Glue Blob Decorations
The variety of things you can do with glue is unbelievable. Need proof? These decorations are made using dried glue, pipe cleaners and beads.
Get the tutorial at Hands On As We Grow »
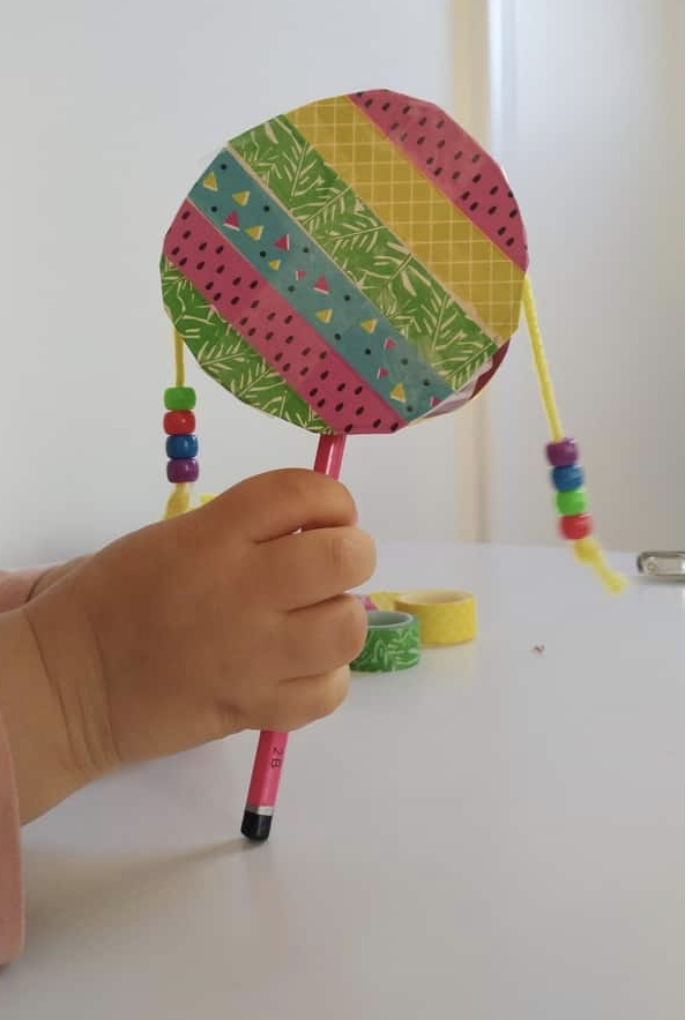
DIY Hand Drum
This DIY hand drum is a great sensory activity and will teach them to love music at a young age. What’s more, they’ll enjoy sprucing up their drum with washi tape, beads and yarn.
Get the tutorial at Hands On As We Grow »
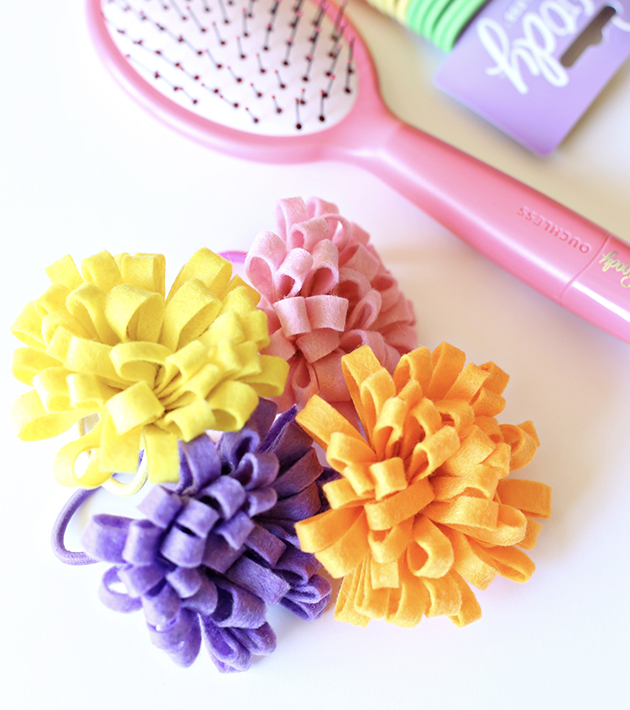
Felt Flower Hair Ties
Forget the tantrums that come when you try styling your daughter’s hair in the morning. She can DIY her very own felt hair tie to add personality to a basic ponytail.
Get the tutorial at See Vanessa Craft »
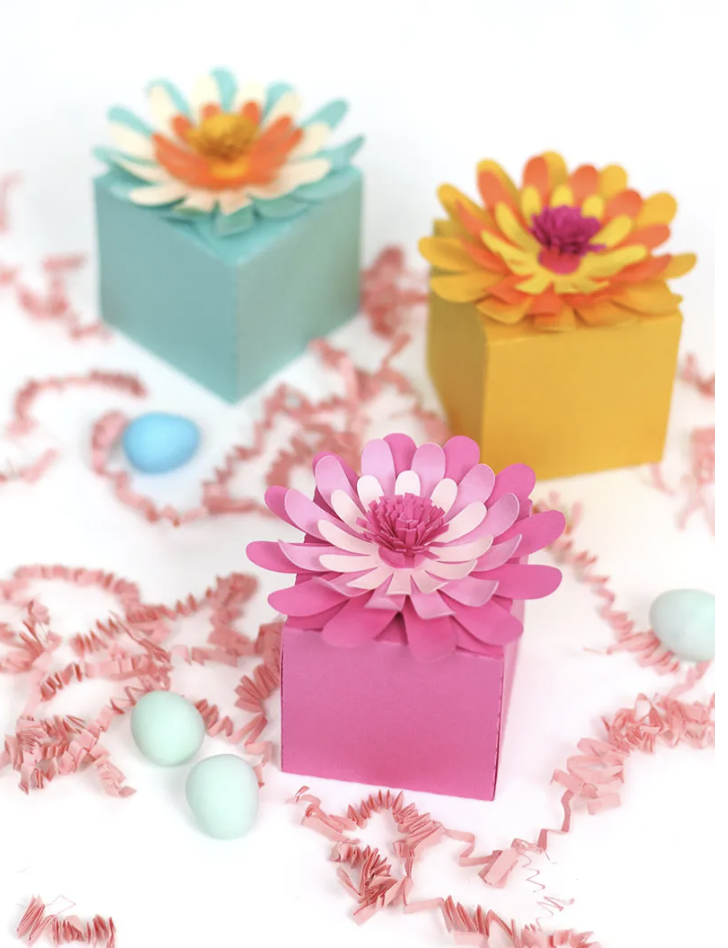
Paper Flower Boxes
This treat box is topped with a three-dimensional flower. They may find it difficult cutting and assembling the flowers together, but with a little bit of help from you, they’ll create the cutest boxes to store their favorite treats.
Get the tutorial at Persia Lou »
Rainbow Fish
This craft is preschooler-friendly and requires mini cupcake liners and a paper plate. The cupcake liners will be the fishes scales, so choose vibrant colors that’ll make their aquatic creature stand out.
Get the tutorial at The Simple Parent »

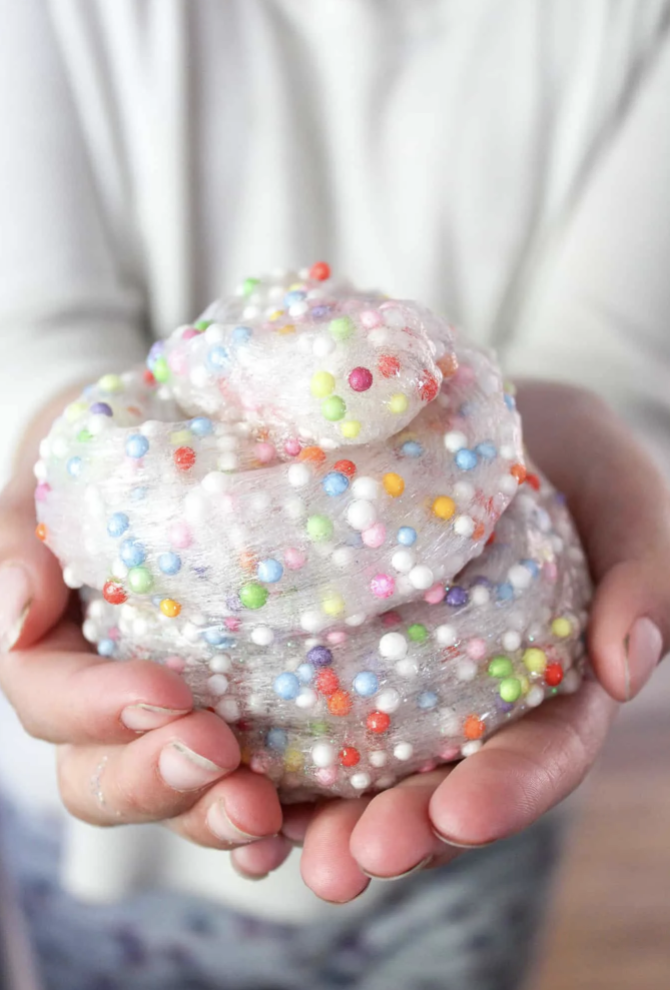
Crunchy Slime
Slime is almost every kid’s favorite thing to play with. You’ll be amazed by how many hours they’ll spend pulling and squeezing this crunchy one.
Get the tutorial at A Sparkle of Genius »
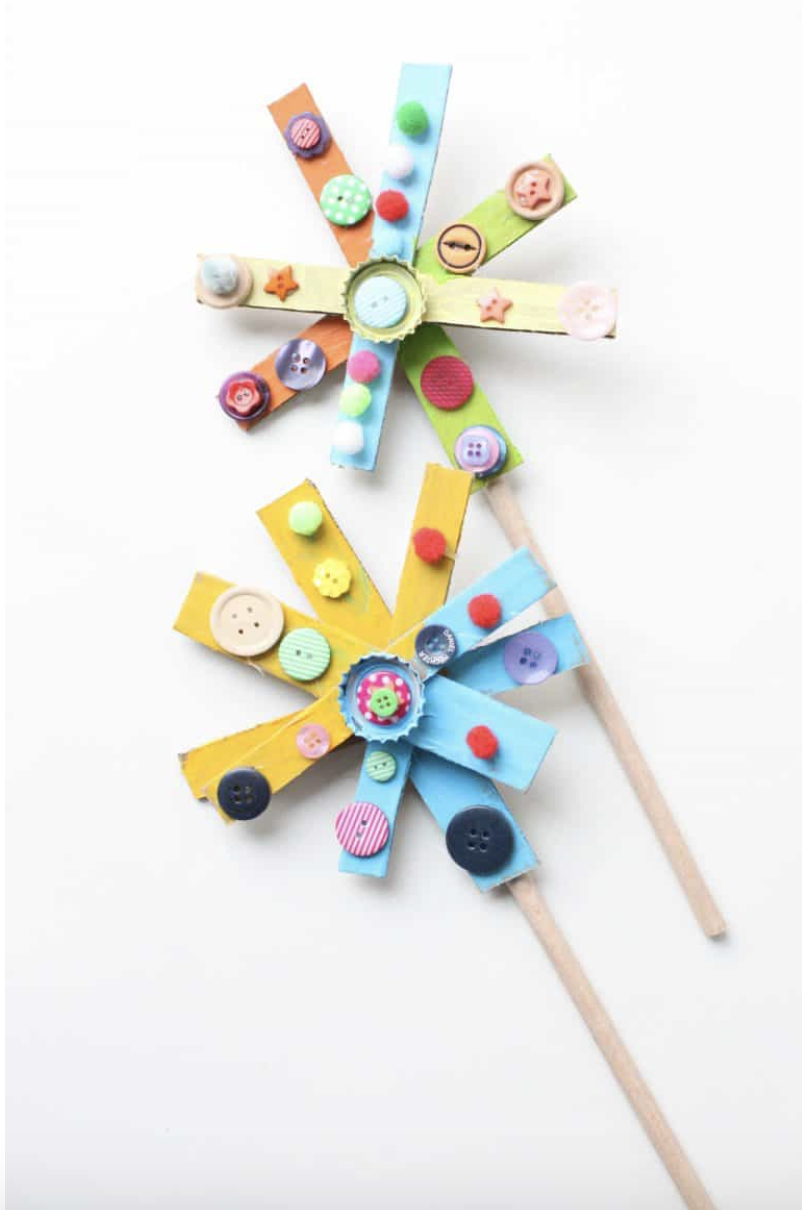
Cardboard Star Wand
While they’ll enjoy decorating and painting their cardboard wands, younger kids may need help sticking everything together, including the buttons.
Get the tutorial at Emma Owl »
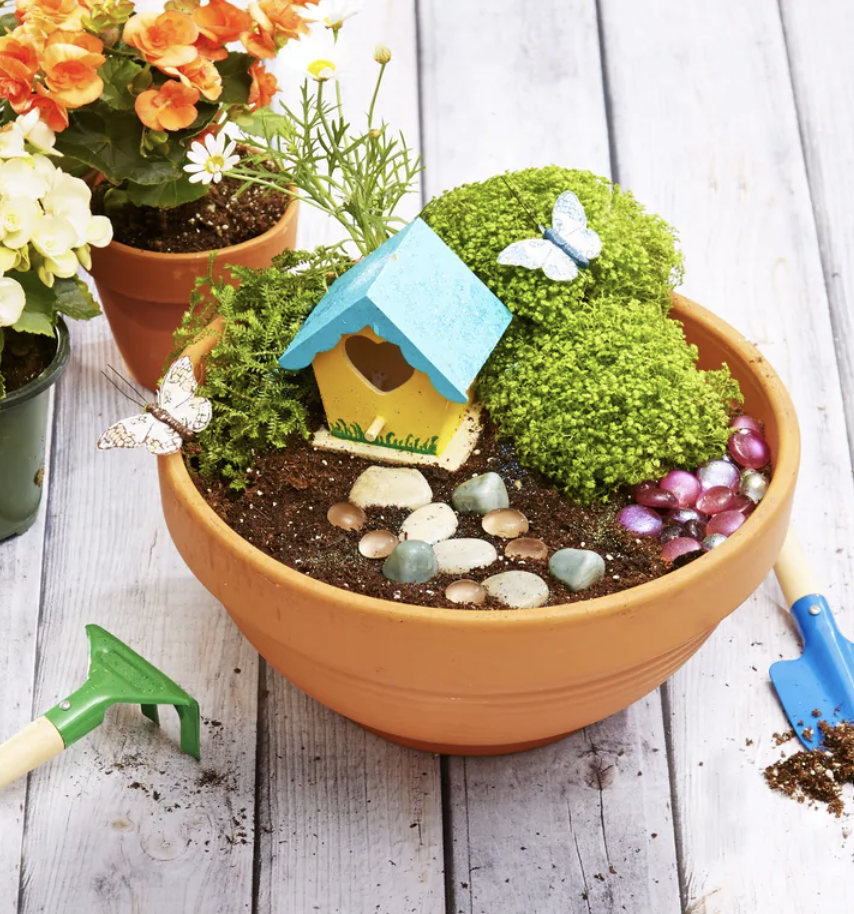
Fairy Garden
Make a mini magical garden with your kids and watch their imaginations soar. After filling their pots with dirt, have them embellish them with rocks, pebbles and any other creative objects they find. Then, sprinkle on some fairy dust (aka glitter) so the fairies know it’s time to play!
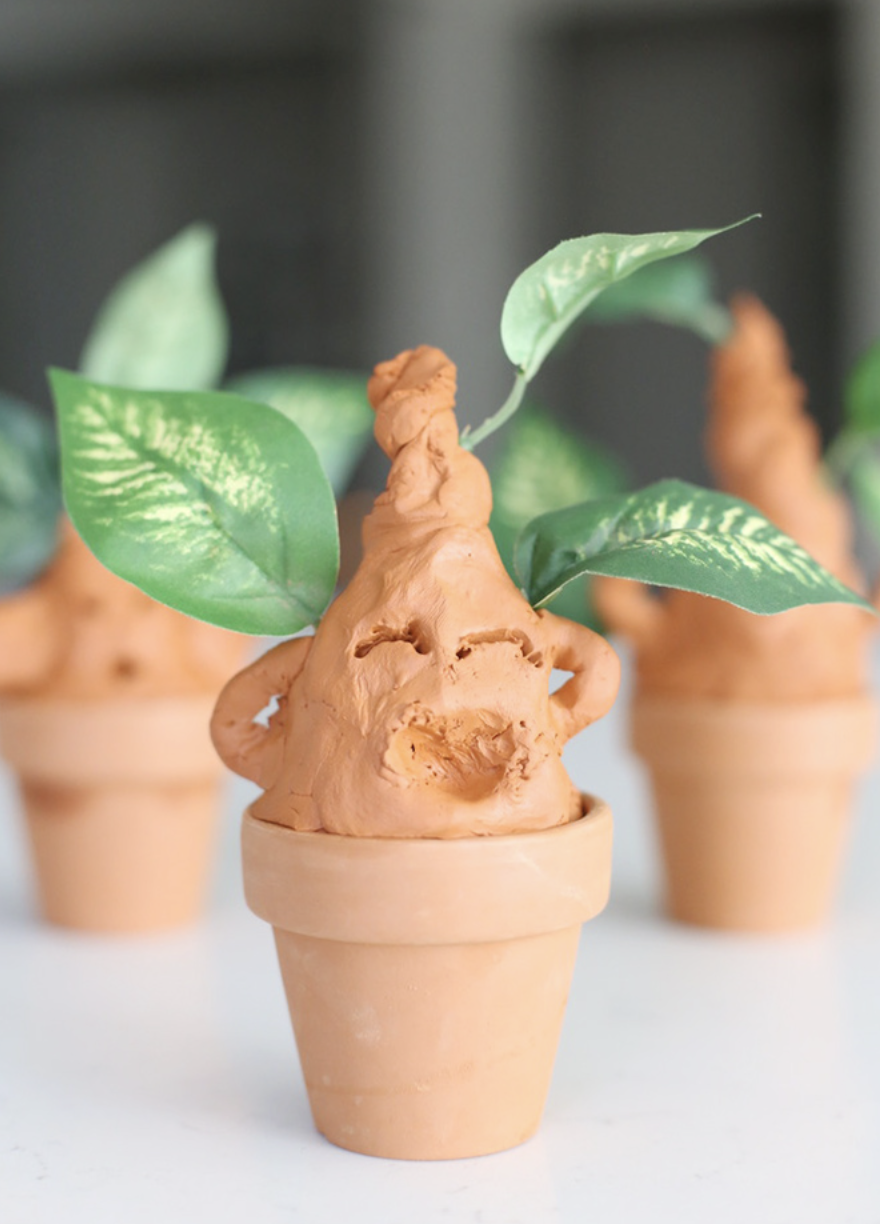
Clay Mandrake
Calling all Harry Potter fans. Have them mush and mold clay into baby mandrakes. Use toothpicks to sculpt the faces.
Get the tutorial at See Vanessa Craft »
You Might Also Like